Posts

Showing posts with the label blog hop

Winner Winner!

Image
Congratulations to Janice Smith! You are the winner of Jenny's wonderful book!  I have emailed you, please email me with your address. 

Free-Motion Quilting Blog Hop!

Image
Jenny Lyons wrote a book about free motion quilting on a home sewing machine.  I was excited to give it a read and see what I could learn. The really exciting part is that the book is for quilters like me. Those who have taken a few classes but still aren't always confident enough to quilt our best quilts. After reading through the book I started on the first part by "placticing." Play + Practice = Plactice.  Jenny recommends a program of Plactice that is 21 days long. I'm almost through my first week and I already am seeing improvements. I'm slowing down and enjoying the process of placticing.  I needed to create some postcards for the Stay Pawsitive  fund raiser being done at Craft Napa next month. Jenny gives some good tips on making post cards on page 43. Post cards are such a great project to practice on. Jenny's pup, Zeke, inspired me to make a basset hound postcard. (Also Jenny is teaching at Craft Napa , so sign up for her clas...

Blog Hop Winner!

Image
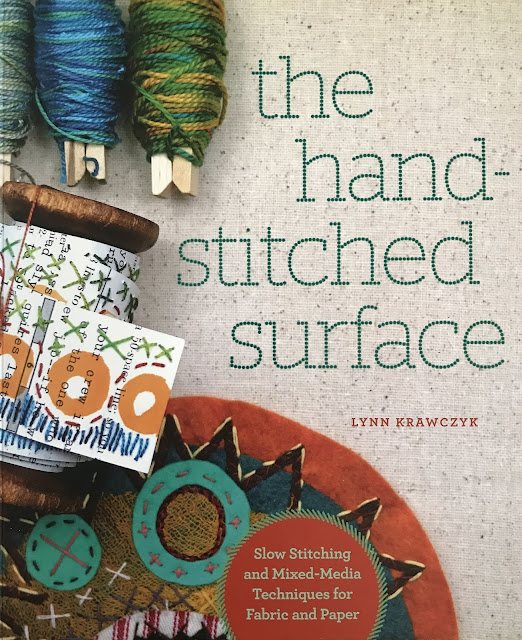
Thank you to everyone for your great comments! It was a lot of fun to read about how much you all love hand stitching. I hope you will all pick up some thread and needle and get to work! Congratulations to Elizabeth Ferry Pekins! You have won a copy of Lynn's wonderful book, The Hand Stitched Surface.  Send me a PM on Messenger with your address and we will get your book sent out.

The Hand Stitched Surface Blog Hop

Image
My friend, Lynn Krawczyk  of Smudged Design Studio, wrote an awesome book this year. I really admire Lynn's ability to let her art brain fly. She gets a fabulous idea and she just goes for it! I spend too much time telling myself why the idea won't work, but Lynn thinks up fabulous stuff and then writes a book about it. I want to be more like Lynn. The Hand-Stitched Surface is all about creating great mixed media art with hand stitching. I've been doing a lot more hand stitching lately thanks to her book, and I have a tip for you: As I've quilted straight lines on my Thunderstruck quilt and the lines aren't always straight. They are straight-ish. I suppose that is part of the charm of this style of quilting, however as I am finishing the quilt I discovered an easier way to make straighter, better spaced lines and I want to share this simple idea: Fold the fabric over, and finger press (or iron) a line.  You now have a straighter line to follow...

Spring Clean Blog Hop

Image
Cheryl Sleboda's call to clean each spring is always needed in my studio. The piles seem to form all by themselves somehow, but cleaning them all up is my job. Sheesh, where does this stuff all come from! Perhaps unpacking from one trip and packing for the next? But on the bright side. . . What the heck is this piece of plastic for?  Do I keep it or toss it? If I toss it, I will surely need it tomorrow. I made it useful again by wrapping some binding around it. It is always so nice to have a clean surface again! Keiko (far left) approves. They just invite me in to dig in and get some work done. Come visit the rest of the blogs on this clean up crew to get your own inspiration. April 23 – Lori Crawley Kennedy –   http://theinboxjaunt.com/ April 24 – Jennifer Thomas –   http://curlicuecreations.blogspot.com April 25 – Robin Koehler –  http://nestlingsbyrobin.blogspot.com April 26 – Andi Barney-   http...

Playful Fabric Printing Blog Hop & Giveaway

Image
A number of years back I had the opportunity to take a class from Melanie Testa. I had read all of her books, watched her on Quilting Arts TV, and followed her work online.  One of my friends accuses me of being a Fan Girl.  I can't deny it, it's true.  I am a huge fan of Melly's work!  I have learned so much about surface design from her over the years. I feel fortunate that our art has brought us together as friends as well. In 2013 I had the opportunity to take Carol Soderlund's Dyeing to Discharge class, and I soon became a big fan of Carol's too.  Carol's class was so well organized, and full of great information for dyeing and discharging.  By the time the week was finished I was exhausted, but filled with new knowledge and fresh ideas for my surface design work. I was thrilled when I heard Melly and Carol would be working together to publish a book on printing fabric.  They are the perfect artists to create this book. I have anxiously a...

Spring Clean Your Studio Blog Hop

Image
The Fruit Trees are blooming so that must mean. . .  It's time to Clean! I posted a photo of my very dirty 9'x10' studio on social media and Cheryl Sleboda over at Muppin.com  immediately invited me to be a part of her Spring Clean Your Studio Blog Hop 2016 .  It's so nice to have supportive friends that encourage you to get your rear in gear and start cleaning! I could have ignored her request and kept making messes, after all I could still see most of the floor, but when all the table and ironing board surfaces get covered I start itching to clean. Of course cleaning creates all kinds of new messes. Items must be moved, cleaned (the fan was full of cat fur!), or tossed, before finally making their way back home.   (Some day I'll have a naming contest for my mannequin.   It seems a shame that she is nameless.) Anyway - one of the studio assistants decided I cleared this spot out just for him. Of course that stalled progress ...

Autumn is for the Birds

Image
I was thrilled when my friend Jamie Fingal ask me to create something using her new fabric line, Autumn is for the Birds, from Hoffman Fabrics. I decided to use my favorite method of creating: free form piecing.  When I create a quilt with this method I rarely plan anything out, other than perhaps a general size and a few elements.  The problem with this method is that I often have to rearrange as I go.  And sometimes I need to unpick - a LOT.  I took a few photos as I went to help me get an idea of where things were going and then based upon those photos I added or changed.  I put the photos together in a short power point so that you could see a little bit of my process.  I apologize for the dark photos as my design wall is in a dark hallway but I think it still gives you a good idea of how things went. The final quilt is approximately 30"x 37". I love the focus fabrics!  There are a lot of textures in all of the fabrics.  Ho...

Fabric Printing at Home Blog Tour

Image
About two months ago I wrote a review about the book Fabric Printing at Home written by my friend, Julie B. Booth . Today I'm going to show you one of the things I learned from her book and then give you an opportunity to win a copy of the book for yourself. I used a hot glue gun to create a design onto a toilet paper roll.  I was impatient and didn't seal the toilet paper roll with white glue or a gel medium before creating my design.   I inserted a short roller handle that one can find at the local hardware store into the toilet paper roll. . .   . . . and used my 3x5" Gelli Plate as a paint palette.  I rolled the paint across a sample piece of fabric. . . . . .first going long ways. . .  . . .and then again short ways. I really like the texture this provides whether I go once or twice across the fabric and I'm gladly adding it to my art "toolbox."  Have you tried something like this before?  What ha...