Posts

Showing posts with the label stamps

Last Day of Blog Challenge

Image
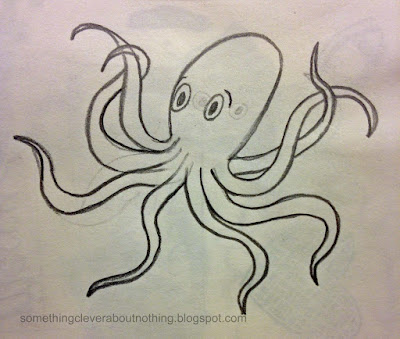
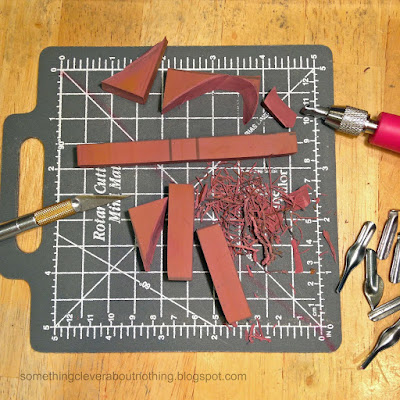
This is the end of the  31 Days of Blogging Challenge .  I am grateful to Cheryl Sleboda for the kick in the pants!  I needed it.  I am pleased with myself for having completed the challenge, as well as the Carve December challenge.  Carve December helped me make sure I had something to blog about everyday!  I hope you aren't tired of stamp posts because I have a few more to share here and in future posts.  I haven't been able to stop carving!  I'll also do a post on the materials I have been using as well as some great resources for learning more about stamp carving.  I promise I will be blogging about things other than stamp carving in 2016.  2016 is a big year in my family as well as in my career.  Family wise, my son is getting married and graduating with his PhD all in the same weekend and to top things off, he and his fiancé will make my husband and I grandparents!!!  Career wise, I will have a couple of appearances ...

Quilt Square Stamp

Image
My friend Shannon asked me if I could make a stamp that was "quilty." Perhaps this simple repeat stamp fits the bill? I want to make a larger version of this stamp and create a whole cloth quilt with it!   \ It has been added to the project list! Day 29 of Carve December.

Pattern Stamps

Image
Pattern stamps are so fascinating. This felt busy, and a bit heavy.  I really liked the open spaces on the stamp so I decided to do something a little dangerous.  There was a strong possibility I wouldn't like the change. Whew! I like it!

Negative and Positive Images

Image
A few days ago I tried to create a positive and negative stamp.  I failed. I eyeballed the images and my eyeballing isn't very exact.  Try number two was much more successful because I traced the negative stamp and transferred the image on to the Eco Karve .  They are still a little off but I really like the look. Each hearts is approximately 1 3/4" square. They are quite small.  I would like to make some larger images like this but I am now out of sheets of Eco Karve.  I guess it's time to make another order to Dharma Trading .

Stars and Hearts

Image
I really want to make Christmas cards.   Great time to think about them, huh?   Since it's Christmas day and all. Let's just say I'm a year early. I've come up with an idea for cards that involve Gelli® prints and . . .surprise, surprise. . . hand carved STAMPS.  The first part is a heart inside a star. I was pretty upset with myself when I slipped with the gouge and broke into the line of the star the first time.  But what are you going to do at that point?  Start over?  I think not.  Then I did it AGAIN!   Good grief.   I kept carving.   UGH I did it a THIRD time!!!  Good thing I was done carving by then.   I stamped the star and found I LOVE the breaks in the lines!  So lets just forget all I just told you about it being a mistake and pretend I planned on cutting into the lines in the first place. It will be our little secret. While playing with the stamp I found they made a cute little ...

One Flower Heart

Image
I am finding that I really making something look like it is in front of a background. Day 24 of Carve December Once Carve December is complete, I will share what I have learned through this experience as well as all the materials I have used.  I look forward to sharing it all with you!

Octopus

Image
A little break from the Heart carving. I have a friend who loves Octopi and I promised her a stamp almost a year ago.  I decided it was time to try drawing something and carve away. I find her pretty funny.   Hopefully my friend likes her.

Flower Heart 2

Image
Here is the negative carving of the Flower Heart from yesterday. I like it. And rather than do an exact transfer,  I eyeballed the two flower hearts. This is what happens when you eyeball. Oops.   Oh well.   This just means I will need to make each of them a mate!

Flowered Heart

Image
Don't you just love when you are enjoying your work so much that you lose track of time?   This has been the case lately while carving stamps.   And when I finally tell myself to head to bed, I find myself dreaming about stamps designs.   This design came to me the other night.  When I imagined the design I imagined it with the background being the positive space.   After some thought I decided I needed to try it both ways. I could have cleaned the background up a bit more but I liked the lines. Day 21 of Carve December.

Heart Circles

Image
I'm still on a heart kick.  I've also started playing around with positive and negative spaces. I'm loving concentrating on the same thing everyday. I honestly have other work I need to do but there are some stresses in my life right now (besides the usual holiday stuff) and I just want to play.  So play I do. It is very therapeutic and I feel like I am learning a lot too. Day 20 of Carve December.

Reverse Stamping on a Gelli® Print

Image
I recently ordered Lesley Riley's book Creative Lettering Workshop , and her Reverse Alphabet Stamps.   I desperately needed a play session and so I broke out the stamps, paints and Gelli® plates. These stamps create reverse letters, therefore if they will create backwards letters if used directly on paper, but when used in a transfer situation they come out perfectly forwards.  I really like how the individual stamps can connect together.  You can put them all together and store them in a big rectangle.  I still need to figure out a storage place for mine. I played around with some cardstock, inks and paints. The words on the pieces in the upper right are stenciled on after printing. I went a little crazy stamping about. Because the Gelli® plate is soft I tried to be careful with how hard I pressed the letters into the paint.  Too soft and the letter was barely there, and too hard and I got an imprint of the box around the letter....

The Forest Floor - Giveaway

Image
The Printed Fabric Bee theme for February was the Forest Floor. I've been playing with the idea of mushrooms for this project. I drew a little mushroom forest for inspiration. . .   . . .and created a stamp from the drawing. I also designed a mushroom stencil I planned to cut using my Silhouette Portrait electronic cutter and then WHAM!  The Hard Drive on my Mac Crashed! Fortunately I had most everything backed up.   Sadly my mushroom stencil was not in those saved files.   On to plan B: Using my stash of leaf stencils and my mushroom stamp. I started with a piece of snow dyed fabric,  because it's always a great base for surface design.  I used Setacolor transparent blue paint for the leaves.   I wanted to give a soft semi-transparent feel for the first layer of leaves.  Next I mixed an orange brown from my Setacolors to stamp a few more leaves . . .  . . .and mushrooms.  And even with all...